30th
November
2005
In one of my favourite forums i found this thread about photography tools for creating high dynamic range images of your own exposure bracketing. It is just a command line application but the results are awesome. I’ve used the HDR Shop before but even with the tone-mapping plug-in the result weren’t good at all with glowing edges and visible seams all over the image.
The new MKHDRI tool uses this method by Greg Ward for automatically matching picture positions. The newest version of MKHDRI and HDRI2LDRI (for low dynamic range compression, jpegs for your crt monitor) can be found here: Version 1.04.02 20.11.2005. The software itself is in english but the tutorial is only in german so far. But its quite easy to use.
c:\ mkhdri -a -co:myCurve.txt -out:myPic.tif myPics\*.tif
For generating the camera curves into the myCurve.txt .
c:\ hdri2ldri -ic:myCurve.txt myPic.tif myPic_ldri.tif
For generating the final LDRI (low dynamic range picture for your crt monitor capabilities). You can get more information by just using the inbuilt help.
c:\ hdri2ldri -?
For getting help.
So there are basicly 2 simple steps.
1. Creating an High Dynamic Range Image and the camera curve (MKHDRI).
2. Using the camera curve to create some Low Dynamic Range Image for your photo gallery (HDRI2LDRI).
He plans to make some nice GUI (graphical user interface) for it, so you have more comfort when generating your LDRI images.
posted in reviews, windows |
28th
November
2005
After researching in the web i noticed that quite a lot people would like to use DScaler for their scheduling applications So i decided to move a step forward and give my little tool some interface and make a few easy modules that can be used by others to interact with DScaler. This Version works with the TvBrowser Capture Plug-in and lets you simply add record tasks per double-click in TvBrowser. In the interface you can delete tasks. The check-interval is 60 seconds, so its related to the start– and stop-minute.
If there is any feedback in near future i might write some documentation for it, but the code is very simple.

Requirements:
DScaler 4.1.11 (Build 4368)
TvBrowser 2.01
(.Net Framework 1.1 needed)
The Scheduler looks like this
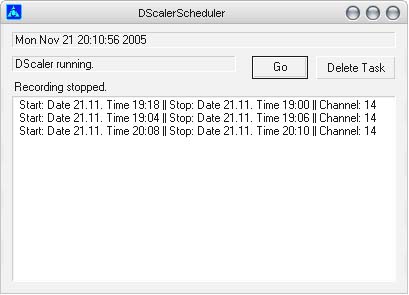
My code is module based so you can easily use it for other applications.
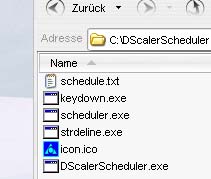
Some installation instruction with simple pictures can be found here .
Please leave comments about compatibility.
Download || Source
posted in windows |
27th
November
2005
I’ve been searching for some program that is capable of real-time recording XVID videos from my Hauppauge WinTV PCI card. Dscaler needs a lot time for configuring all settings but in the end its a great tool.

You can even “hide” the channel logos using some plug in called “Logo Killer”. Recording XVID on CBR(Constant Bit Rate) at like 900Kbps with some MPEG Layer-3 for Audio works really nice. The Problem is that there is no decent scheduler for recording coming TV shows.
So i found this awesome Java based Open Source project TV-Browser , a free TV program magazine for your Windows, Linux and even Mac.
How to combine these 2 Programs now ? TV-Browser has some Capture Plug-in. You can assign “External Channel Name Parameter” and use command line tools.
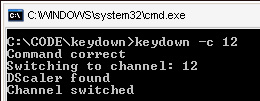
Since DScaler has no command line control i tried to make my own. Using the window handle(FindWindow) and sendMessage (getting the wParam and lParam by Spy++). It works on my Win XP if DScaler is already running.
Further thoughts:
- check if DScaler is running, if not than start it
- adding some flags for record and stop like keydown -c 12 -r
(switch DScaler to channel 12 and record)
(for some reason the DScaler window can only receive numeric chars by WM_CHAR so i can’t pass {shift+r})
Well, instead of using keystrokes to perform action i tried it this time with menu and window handles. It is working pretty good.
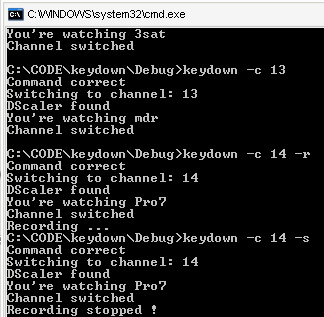
I’ve added the output of the tv channel name out of DScaler.
Other suggestions are welcome. You can download the tool with source code here.
posted in windows |
26th
November
2005
Reading the Canon Powershot S80 review on dpreview i was wondering if they finally build a good video mode into the S-series. I’ve been playing with the Canon S2 IS a lot and its video mode is really great. Using 5x1GB SD cards you got plenty of recording time and its still a lot smaller than some mini-DV cam corder. Comparing the video quality I must say i prefer the S2’s video to the mini-DV’s because streaming the DV video over the fire-wire port takes quite a lot of time and the final quality is not that crisp on todays HDTV screens.
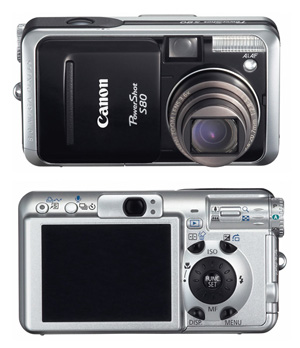
Here (scroll down) you can find 2 sample videos of the Canon S80. That cam is really small and takes good 640×480 @ 30fps videos for my taste. Due to its heavy sharpening in the video mode and the good wide-angle lens you have some weird pattern effects in the video. On the S2 there was some video mode option for low sharpening which was noticeably less sharp but did a better job at wide-angle settings in cityscapes. I bet in one of their next models with more improving SD card speeds and controller speeds we will soon have some 720p (HDTV) @ 30 fps video mode on these little pocket cameras.
posted in reviews |
24th
November
2005
nik multimedia released their new sharpening tool nik Sharpener Pro 2.0.
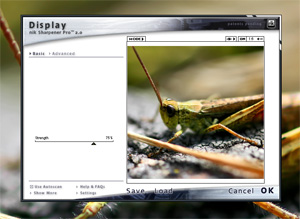
Did you ever have a sharpening tool with just a single slider and still have good results ? In the advanced mode there are 5 different base colors ( black, grey, white, yellow, blue ) for sharpening. Color Frequency based sharpening makes sense. For example you have a sunset sea picture with some shadow shape of a palm tree. Other tools would give you nasty highlights at the high contrast edges but with this tool you can suppress the black sharpening easily and push the red of the sunset or the blue of the water. It is easy to use tool with nice results but the interface design is not my taste.
posted in mac os x, reviews, windows |
24th
November
2005
Since I’ve been disappointed by the color performance of recent DSLR cameras, i got myself some old Canon EOS 650 with a Fuji Velvia 50 slide film. The slide film looks great on a slide projector but how do I get this pictures into my computer ? After reading a bit in the web i found some interesting site: film scanner.info – german reviews . In my university’s labs I found a Nikon Coolscan 8000 ED (4000 eur).

Doing further research in the web I found some forum threads about scanning slides with your DSLR using homemade slide scan adapters. Just use a dark box with holes for the light source and the lens and place the slide in front of the light source (cold light “day light lamp” with 5000 Kelvin should be best choice).

My results weren’t that good, I had to do lots of post processing. There are old M42 bellows for slide scanning that you can use with a simple “M42 to EOS adapter”. Using that with a light panel or some 5000K lamp with good diffuser glass should give better results.
The Nikon Coolscan 8000 ED gave me like 8–9 MP(megapixel) and my homemade solution with the Canon EOS 300 D about 3–4 MP of the Fuji Velvia 50 which is supposed to have 25 MP on drum scanners. Color quality didn’t impress me at all on both systems. Slides were made for slide projectors. Maybe I’ll find a better scanner (or just good scanning software) one day.
posted in reviews |
23rd
November
2005
I just tested this new noise removal software by Imagenomic.
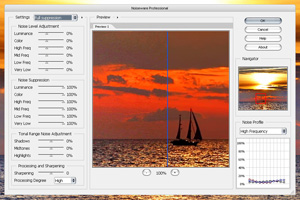
Having seen Noise Ninja and Neat Image i must say Noiseware is more simple, faster and the results are very good without playing with the settings for hours. I’m not easy to impress but this little tool is really great. I wonder what techniques (algorithm) they use.
posted in mac os x, reviews, windows |
21st
November
2005
Was just looking at this new Nikon lens. I wonder if it will be available in Germany before Christmas. Nikon is always a little slow with publishing new products. The price will be another mystery, i guess around 700 eur. The specifications are very impressive. This will make many newcomers buy a Nikon D50 with this 18–200 lens instead of a Canon 350D with their scrappy kit lens.I found some MTF Charts.
MTF Charts: left 18mm and right 200mm
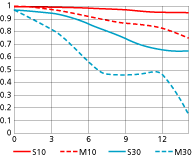

Yes, there are recent alternatives. Tamron and Sigma have some 18–200 lens. From the pictures I’ve seen so far i think the Tamron is far better than Sigma. Here is a link to some babelfish translated comparison between Tamron 18–200 vs. Sigma 18–125 vs. Sigma 18–200 (The ?????? is probably the Tamron).
- Focal length: 18-200mm (equivalent to a 27-300mm lens in 35mm format)
- Maximum aperture: f/3.5-5.6
- Minimum aperture: f/22-36
- Lens construction: 16 elements in 12 groups (two ED glass elements, three aspherical lens elements)
- Picture angle: 76° – 8°
- Minimum focus range: 0.5m (1.6 ft.)
- Attachment size: 72mm
- Dimensions (approx.): 77 x 96.5mm (3.0 x 3.8 in.)
- Weight (approx.): 560g (19.8 oz.)
- Included accessories: 72mm Snap-on front lens cap (LC-72), Rear lens cap (LF-1), Bayonet hood (HB-35), Soft lens pouch (CL-1018)
- Optional accessories: 72mm screw-in filters
Update:
Some people complained about the light fall off. Samples . And here is some link with smaller samples taken with this lens, apart from all the green sky that the D70 gives with its bad AutoWhiteBalance the pictures look quite good, bokeh is quite smooth on tele end. An other link with snapshots taken with Nikon 18–200.
And here is some thread with links comparing the Nikon 18–200 with 5 other lens ( Sigma 12-24, Tamron 28-75, Sigma 30, Nikon 60 (Micro), Nikon 80-200 (2 ring)).
posted in reviews |
19th
November
2005
For all the people looking for the Canon EOS 300 D firmware hack (new beta version B7.1): look here
The original Canon EOS 300 D firmware: look here
Just unrar the file and copy it to your memory card, restart the camera and follow the camera’s screen instructions. Very easy to install. I use myself the FEC (Flash Exposure Compensation) the most and the new fast delete right after taking a shot.
posted in reviews |
19th
November
2005
Since the Online Documentation for Fox-Toolkit is not very fast i found the “FOX Documentation for Visual C++ version 7, HTML Help 2 format” FOX-docs-vc7-setup.msi . In order to install it you need to select in .NET Studio 2003’s options (Environment ->Help) the “Internal help” called “Visual Studio .NET 2003 Combined Help Collection”. Than go to the help manager by using this link “ ms-help://MS.VSCC.2003/VSCCCommon/cm/CollectionManager.htm “ in your MSDN Library Help and set “ Fox Documentation “ for your VSCC. Refresh , restart the MSDN Help and your are done.
posted in windows |
19th
November
2005
I just got this 3d glasses: Elsa Revelator 3d (wired). Started playing with it I noticed the heavy ghosting. At first I thought it was my screen (150Hz) but its the glasses. The low contrast in the LCD displays causes some ghosting effect (see shadows of the right image in the left eye) on high contrast pictures. The new feeling in games like Call of Duty 2 was pretty amazing but I found the flickering too annoying. A little research brought some light in it. Lots of people having problems with flickering in Windows XP. Some say its the USB devices, other say its the graphic cards IRQ conflict and others say its the DCC Line command from plug&play monitors.
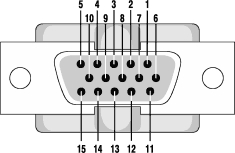
They say removing pin 12 (DCC line 5V) might help. So I tried it but damaged the cable (monitor cable adapter) so the glasses wont work anymore. I got mine for 15 eur ($17) so it doesn’t matter.
After reading a lot about 3d-stereo in Windows XP I found this Emagin z800 , pretty expensive $899, but from all the reviews I found they should be very good.
3D Stereo Drivers for Nvidia Cards Version 78.01 in Windows XP but don’t forget to install the the Base Drivers from Nvidia 78.01 .
posted in reviews, windows |
18th
November
2005
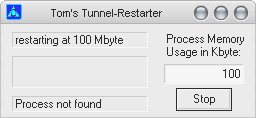
I created some helper tool for the recent beta of the HTTP-Tunnel Client v3.4.2852 . It detects the running process of the HTTP-Tunnel and restarts the application when its process memory usage surpasses a certain amount. The application can be minimized to a tray icon by double click on the tray icon .
download (.Net Framework 1.1 needed)
posted in windows |
18th
November
2005
You ever wanted to have the nice Wallpaper Changer from Mac OSX for your Windows XP ? Now you can have it with a few simple steps.
1. Download this file rotator.zip. Extract it to any location you want. You will find a file called rot.htm and a folder pics/ containing 4 sample images.
2. Add your images to the pics/ folder and rename the image files to a#.jpg for example your 5th pic would have the name a5.jpg If you have many pictures you can use some Batch File Renamer like this one FileRenamer .
3. Edit the rot.htm file in the upper part. Insert the number of your images. If you have like 7 images you simply modify it to images = 7; . Save the changes.
4. Got to the Windows Desktop Wallpaper selection screen and simply chose the rot.htm . Done.
A demo (using IE) of this Application can be seen here(only IE, slow transition so have patience).
posted in windows |
16th
November
2005
To remove blogger’s navbar I used this lil code snippet in the blogger style sheet settings:
#b-navbar{
height:0px;
visibility:hidden;
}
posted in reviews |
16th
November
2005
Today I decided to tryout Blogger.com and search for some utilities that make it easy to blog such as windows applications. Found tools like BlogJet and blogbuddy , ecto and so on. I need some drag&drop picture add tool that creates thumbnails itself and uploads everything itself without questioning. Just found this site with lots of tools about blogging. After trying all of the tools BlogJet is my final decision for now. Hello has lots of login problems and the application bugs you with its problems all the time. So I got some webspace at funpic and decided to use BlogJet’s ftp upload feature.
posted in windows |


