• Pictures and Code

  • Everyday findings on the internet and homemade tools. Topics are photography and coding.

18th November 2011

The Ultimate Audio Guide for Mac OS X 10.6

I thought if I was able to play .flac files in iTunes I got the maximum audio quality out of my iMac. If you are interested in how to achieve this, read this post.

Fluke

Later I found fluke which made life a bit easier, since the annoying import process was disposed. Next I found Hear from JoeSoft which replaced the awkward equalizer in iTunes.

Hear - Equalizer for Mac

It is pretty simple to install and offers a lot of settings to play with.

Hear Interface

I’m using Hear version 1.0.5(497) on Mac OS X 10.6.8. Not all of the features improved the subjectively received audio quality but some really helped. Next I found out that ALAC (Apple Lossless Audio Codec) went open source. Downloading Max 2 was easy, as well as converting the .flac files to .mp4 (container for alac encoded track).

Max 2 for Mac

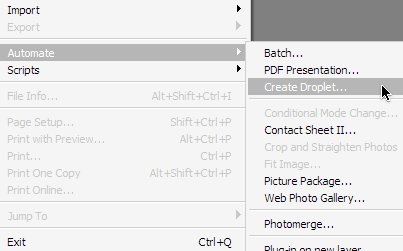
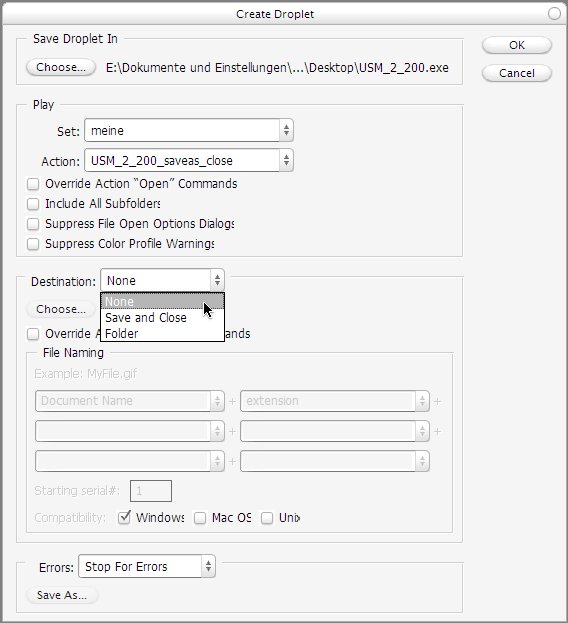
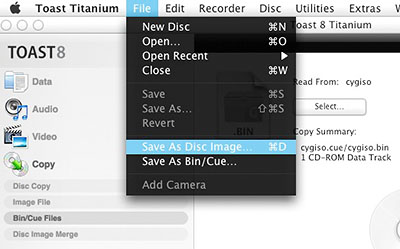
The only thing you have to do is setting the default output of the converter to "Apple MPEG-4 Audio (Apple Lossless)" it pops up if you just select "Apple MPEG-4 Audio" as shown below.

Max 2 select format

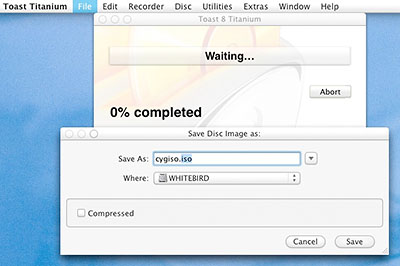
In the list it should look like this.

Max2 output format

Don’t add any other formats here or every input file will be converted to all the formats shown in that list. Now that all files are encoded in alac I didn’t have to convert the files anymore for the iPhone thus not having all .flac files concurrent with their mp3 files in my iTunes library. Alac plays natively on most Apple devices. Ok the next step was to use the optical output from the iMac in order to improve the audio quality. It was quite easy to buy a Toslink cable with 3,5mm jack on one side and a standard Toslink jack on the other side. Beware of 2,5mm Toslink jacks since they are called "mini Toslink" as well. If you plug in the 3,5mm jack your system audio output in OS X switches automatically to digital out. But than I encountered a problem.

Mac OS X digital audio out no system volume

If you use the digital optical audio output of your iMac you cannot access the system output volume anymore with your keyboard shortcuts or apple remote. In order to fix this I had to install soundflower. There are a few steps to get it up and running.

At first restart your iMac after installing soundflower.

Next look into your menu bar for the sound flower icon and set the "Soundflower (2ch)"(for dolby surround select the "16ch") to "Built-in Output" as shown below. I set the buffer size to 2048 as well, don’t know if its important but bigger is better as usual.

soundflower menu settings

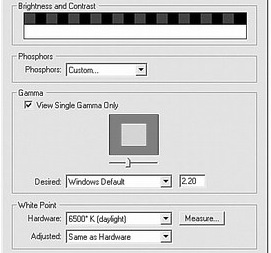
Next you go to your system’s preferences and open the audio settings.

system preferences audio settings

Select the "Soundflower (2ch)" as your default system wide audio output.

audio output system wide

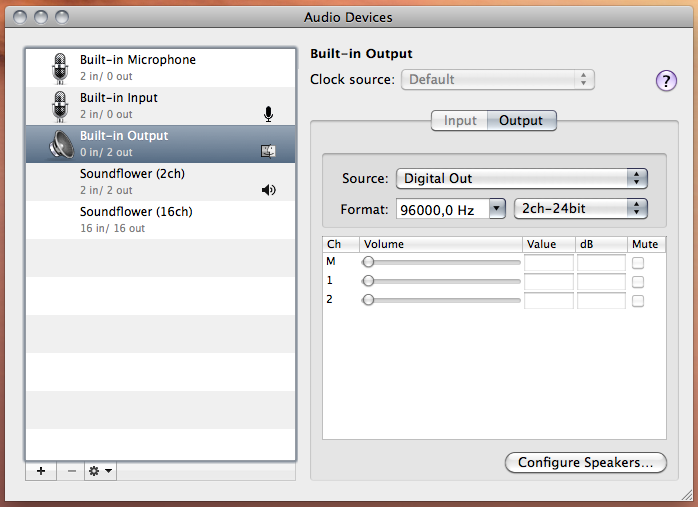
Now go to your Audio Device preferences (Applications > Utilities > Audio MIDI Setup) and select the "Build-in-Output". Set the format to the maximum supported sampling rate("Format") of your audio device (in my case an audio converter with 96Hz) and select the maximum sample size like "2ch-24bit".

Now go to the "Soundflower (2ch)" device and set the sampling rate("Format") to the same frequency as before (96Hz in my case). The sample size is preset to "2ch-32bit" and can’t be changed which is ok.

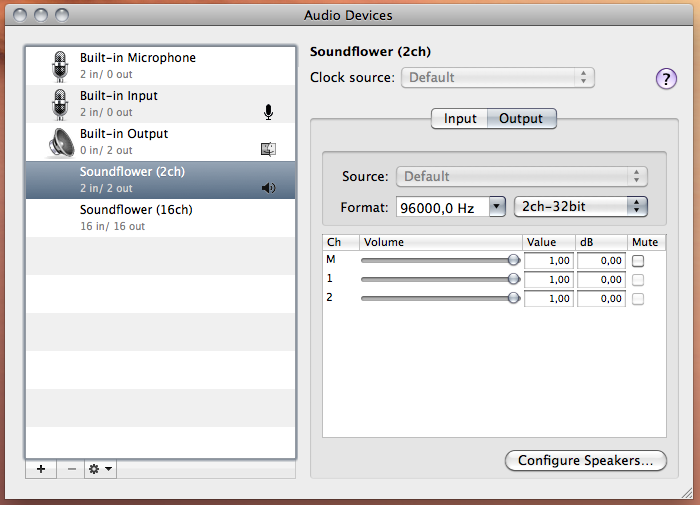
It might sound weird to output a 32bit source to a 24bit output but its downscaled properly and just works this way. Just play a song in iTunes, cross your fingers and hopefully you’ll hear your music. Now you can use the volume shortcuts on your apple keyboard again and the apple remote can adjust the volume as well again.

The audio pipe in your system goes now as followed:

iTunes (or any other app with sound) > CoreAudio (driver for soundcard in your mac) > Hear (equalizer) > soundflower (enable system volume) > digital output (Toslink output on you iMac) > your external audio device

Worked for me.

posted in mac os x, reviews | 1 Comment

3rd March 2011

Improving vlc’s .mkv playback in Mac OS X

When loading big .mkv files(like 3-5Gb) into VLC with hd content and maybe even subtitle tracks you’ll notice slow loading times. You’ll although notice that OS X is building up a huge pagefile because it eats up your memory, requests virtual memory and thus starts paging to the hdd.

vlc

To speed up the movie loading times(movies with subtitle tracks) in VLC open up the Terminal.app:

sudo chmod -R 777 /usr/X11/var/cache/fontconfig

To avoid VLC eating up all your memory while playing big .mkv files:

  1. Open up VLC
  2. Go to "VLC" -> "Preferences"
  3. Show "All" preferences
  4. Go to "Input / Codecs" -> "Access modules" -> "MMap"
  5. Uncheck "Use file memory mapping"

This saved me from a lot of headache. By the way, its always a good thing to clear all kinds of caches (like the font cache) from time to time using tools like Onyx and repairing disk permissions with the disk utility. Worked for me.

posted in mac os x | 26 Comments

19th September 2010

HowTo get the Xbox Controller S working in Windows 7 (64-Bit)

To get the usb connected Xbox Controller S working in Windows XP was quite easy using the XBCD drivers.

XBCD drivers for Windows XP

But installing them on a Windows 7 (64 Bit) system was quite a challenge due to the lack of information.

Xbox Controller S

If you read about this topic you’ll find many tutorials in forums on how to get unsigned drivers working in Windows 7. But you don’t need any of this …

Just install the drivers for the 3 in 1 Magic Joy Box (PC035) for Windows 7. All analog axis work and even the force feedback (at least in Dirt 2).

posted in reviews, windows | 75 Comments

17th August 2010

HowTo disable spellchecking in SRWare Iron (Chromium) for OS X

If you like Chrome and use Snow Leopard it is quite hard to surf without sending all kinds of statistics to google. In Windows there has always been a proper alternative named Iron. Lately I found this blog post, telling that they have a stable version for MacOS now.

SRWare Iron for MacOS

You can install the same extensions as you would install in Chrome like Adblock. To disable spellchecking permanently you have to modify the
~/Library/Application Support/Chromium/Default/Preferences
Just add the following lines in the end of the file (but before the last closing parenthesis):
,
"spellcheck": {
"dictionary": "no-NB"
}

Just don’t forget the comma in the beginning. You can’t enter empty strings anymore and for future compatibility you should enter something valid, like the Norwegian accent "no-NB". As long as they don’t create a dictionary for this language it will work.

Another thing is to disable the translation bar since it is pretty annoying. Luckily you can do this via Iron’s preferences "Under the Hood".

SRWare Iron disable translate

Worked for me. And by the way … If you are annoyed by the mouse gesture extensions, especially on the 404 pages, just get xGestures. Yes it still works in Snow Leopard and it’s worth every penny since you can define mouse gestures for all your Apps throughout the whole system.

posted in mac os x, reviews | 138 Comments

17th August 2010

Smooth video playback in Mac OS X Snow Leopard

In Windows 7 I’m using Shark007’s codec pack along with the 64-bit components. Special codecs like nvidia purevideo, CoreAVC or the Cyberlink 264/AVC codec help you to get real smooth HD playback. Especially in 1080p movies the visual difference between two frames is so broad that you need to interpolate additional information between two frames by guessing the movement between the frames.

For Mac OS X is no such solution. Some players like MPlayer OSX Extended pretend to improve the visual quality, but i never really got the player working (crashes when trying to update). The VLC playback is stable and "consistently smooth" but not as smooth as I’m used from Windows 7 and the is no way to improve it by using different codecs or tweaking.

Then I found CoreCodec CorePlayer for OS X.

CoreCodec CorePlayer for OS X

There is hardly any information about this player in the web. I couldn’t even find a trial version for mac. So I just bought it and tried it. Well, the first try gave me no sound (AC3, DTS). After reading in the forums I found out that many people complain about this missing feature. I tried to write some apple script that starts CorePlayer and VLC (disable video stream) simultaneously, but most HD movies went out of sync after short time. I tried to compensate this with global keyboard shortcuts for VLC’s audio delay tweaking, but its no fun.

By accident I found a forum post about using Perian‘s AudioQueue as the AC3 audio pass through for CorePlayer.

Perian

I can say its up sync most times in HD movies. Just don’t do anything else in the background (at least on my i5).

CorePlayer settings

The playback is still not as smooth as in Windows 7 in extreme high motion scenes but its a lot better in slow and normal motion scenes. It plays my MKV h.264 AC3, DTS movies quite nicely and I’m using it as a VLC replacement on Snow Leopard now. Worked for me.

posted in mac os x, reviews | 1 Comment

6th March 2009

Qt4/C++ Development with Leopard

I got tired again of developing in Windows XP. Since my Vista destroyed itself within a micro second XP was my last hope. I thought it must be possible to code stuffs in Mac OS X Leopard too. I tried installing the old Eclipse 3.2.1 because of the one and only QtClipse Plug-in I knew from old times. I couldn’t find some Eclipse 3.2.1 binary with CDT included for Mac so I downloaded the platform release and installed CDT 3 via software-updates. So far so good. I tried installing QtClipse but without success. So I thought about using KDevelop but I didn’t want to go through all the hassle installing KDE and so on. Using XCode was not a good alternative after various reports about malfunctioning code completion (code sense).

Qt SDK

Suddenly I stumbled upon this article about Cmake, Qt4 and XCode on OSX. He pointed to the Qt SDK for Mac (430 Mb). Installed like charm and worked very smoothly without any further configuring or installing. Code completion in QtCreator is at its best. Since I like a few packages from libqxt I downloaded, extracted and installed it.

./configure -no-db
make
make install

Additionally I had to copy

libqxt-0.4/src/gui/qxtwindowsystem.h

from the downloaded source package to

/usr/local/Qxt/include/Qxt/QxtGui

but that’s almost it. The qxt.prf was not deployed into the correct folder, so I had to move it manually to /usr/local/Qt4.5/mkspecs/features/mac. After that I added these 2 lines to my .pro file:

CONFIG += qxt
QXT += core gui

And that’s it. Qt Development in Mac OS is pretty easy and comfortable now. Worked for me.

posted in mac os x, reviews | 0 Comments

4th March 2009

Flex SDK with Actionscript 3 using webservices

Coming back to coding Actionscript after a while I noticed that you got to fix more and more bugs over the years of Flash development. Yes there were many limitations with AS1.0 and AS2.0 using Macromedia Flash, MX and CS, but the recent movements in Adobe’s labs make me wonder where they want to go. For example using their mx.rpc packages with flex and AS3.0 gives me a lot of headache. Gladly I stumbled upon the “YAAB – Yet Another Actionscript Blog” and found this article about Remoting with BlazeDS from plain vanilla Actionscript 3 class. He summed up all the workarounds and problems you get when trying to work with Remoting from AS3.0.

Remoting with AS3.0 - BlazeDS - Flex SDK - Axis2

At first I tried using Axis2 for remoting. But the recent versions of Axis2 Service Archive Wizard – Eclipse Plug-in and Axis2 Code Generator Wizard – Eclipse Plug-in are buggy at times when you want to achieve very simple tasks. To generate a services.xml and .wsdl file seems to work but stuffing em into some .aar package with the Archive Plug-in results a faulty Service Archive. So there was almost no possibility to change the session scope of the werbservice or access and register remote classes. Switching to BlazeDS gave some advantages. Now I didn’t have to build some .aar package because it just interprets my .class and .jar files. All I had to do now was looking for the right AMFChannel and now I was able to transfer complex Objects in both ways. I just wish I had found the YAAB blog entry a few days earlier.

posted in linux, mac os x, reviews, windows | 293 Comments

1st July 2008

Mac OS x86 10.5.2 on AMD SSE2 the challenge

On of my HDD’s crashed and my old 10.4.6 install was on that drive. Of course I do create backups of all my data regularly and nothing was lost but time. So I thought I could try Leopard on this occasion. Kalyway 10.5.2 for AMD didn’t boot at all. Next on my list was Leo4Allv3. It booted and installed like charm. But there were still some issues after the installation was done.

I had to fix the graphics driver problems for my old 6600GT. In my case it would be best to install the system without any special nvidia drivers. Because later on I used the Zephyroth NVidia Universal Installer from Zephyroth Utilities. To be on the safe side I repaired the kext permissions right after and rebooted. Worked from scratch with perfect resolution and QE/CI.

Next I had to disable Spotlight because the indexing drove me mad and maybe crashed the system by accessing my windows drives.

Adium 1.2.5 gave me that weird error message for my icq account that my client was "too old". Tried a few other versions including the beta 1.3b5. In the end I gave up and went for Proteus. It looks cleaner but not as sexy as Adium.

Next issue came with installing Skype. Since I’m using Growl I got these nasty notifications when somebody came online or sent a chat message. So I disabled Growl for Skype. System Preferences – Growl – Applications: remove marker in the Skype checkbox.

FrontRow had a few issues with Divx and Xvid movies but it was easy to fix with 2 Quicktime Components. Xvid Component Binary and the Divx Codec. After one reboot everything was working smoothly.

As I remembered from 10.4.6 the little arrows on the alias icons weren’t that sexy. It was quite easy to remove the alias icon arrows.

Last task was to make a little Automater script for hiding and showing hidden files and folders in the finder.

The only bug that is still persistent is caused by my USB Bluetooth dongle. After pairing a device I had to reboot or replug the Bluetooth dongle because it gets deactivated right after pairing. I although had a few issues with Salling Clicker 3.5. I couldn’t connect from my SE K800i because the security blocked the access randomly. So the easiest way around was to "Browse Device …" and connect while browsing. When you connected Salling Clicker you can close the browse window. I’ve read a lot about USB Bluetooth dongle problems in 10.5.2 but somehow I couldn’t find a decent fix, just these workarounds.

As I’m writing this blog entry I’m using Qumana 3.0 and surprisingly I didn’t have any crashes yet from that application. Update: It just crashed as usual on the damn slow spell check.

Worked for me. Leave comments so I can add solutions and fixes.

posted in mac os x, reviews | 13 Comments

30th September 2007

My favorite Image Viewer for Mac OS X

In one of my earlier posts i was talking about my favorite image viewer for windows. So far i’ve been using PicturePopProCM 2 for viewing pictures instantly fullscreen out of the finder. But there were a few annoyances, like option click for accessing into the context menu plugin or the missing ability for RAW-file previews and by that it was even pretty slow on JPEGs. Recently i stumbled on a new project on my favorite os x freeware site.

Sequential 1.2.1

Sequential 1.2.1 (latest version to date) is fast, opens by simple double click in finder, displays all images in a folder “sequentially” 🙂 and has proper RAW-file support. An other cool feature is the quit by escape function just like FastStone’s MaxView in windows. I’m still missing some features, like a simple slideshow script and proper image rotation on RAW-Images. I’d although like an option for hiding the application icon in the dock when the software runs in background because somhow it doesn’t work that well with Dockless and Dock Dodger. But so far this is the best one. Worked for me.

posted in mac os x, reviews | Comments Off on My favorite Image Viewer for Mac OS X

19th July 2007

Lightroom Post-Processing with ImageMagick

This time i wanted to post-process my exported Lightroom images without opening Photoshop. So i decided to use ImageMagick which has helped me before in lots of other situations. The task was to realize some very fine sharpening and frame the image with some very simple white line and some black border. I’ll describe it for Windows users in this article but OSX users should be able to adopt this with AppleScript very easily. Thanks to Pascal Abaziou i was able to shorten the batch file script by using the shift command.

Step 1

Download the Binary Release of ImageMagick for Windows ( Win32 static at 8 bits-per-pixel ) right here and install it to the default location (for me it was like “E:\Programme\ImageMagick-6.3.5-Q8”) with all default installation settings.

Step 2

Create a new text file on your Desktop using your favourite text editor (Notepad, Wordpad, Textpad, …) and save it as “USM_Border.bat” to your Desktop. Now lets fill it with some content:

@echo off
echo Processing…
:loop
if “%1”==”” goto endloop
if exist %1 call “E:\Programme\ImageMagick-6.3.5-Q8\convert.exe” -unsharp 0.3×0.4+0.45+0.05 -unsharp 0.2×0.3+2.0+0.05 -bordercolor White -border 1×1 -bordercolor Black -border 30×30 %1 %1
shift
goto loop
:endloop

Ok, save the file changes. Lets go through these lines a little bit to see what we’ve done here … if exist %1 just checks if there was an argument (filename) delivered by Lightroom … call “E:\Programme\ImageMagick-6.3.5-Q8\convert.exe” just calls ImageMagick at the location we installed it before (change this if your installation path is another) … -unsharp just calls the Unsharp Mask Filter, if you want to read more about its options, just go here … -bordercolor -border just create the border …

Step 3

In Lightroom go to “Export” and in the “Post-Processing”-area you click “Go to Export Actions Folder Now”.

Lightroom Export Options

Next, move the previously saved batch file (“USM_Border.bat”) from your Desktop into Lightroom’s “Export Actions” folder.

Export Actions Folder

That’s it. Now you can choose the batch file in Lightroom’s “Post-Processing”-area as your “After Export”-action. You can download my recent batch file here.

Export Action Result

The result would look like this when exported as 300px image. It worked for me, but if you have any questions, just leave a comment here. (Sometimes this method won’t work if you have too many special characters in your file path or just spaces.)

posted in windows | 4 Comments

18th July 2007

Lightroom Post-Processing with Photoshop Actions

In my case i wanted to apply some extra sharpening after Lightroom exported some RAW files. But if you want, you can apply this tutorial to any other Photoshop actions: framing, noise reduction and whatever.

Step 1

Create your Photoshop action.

Create your Photoshop action

Step 2

Create a Droplet for your Photoshop action.

Create a Photoshop Droplet

Save the Droplet to your Desktop.

Save the Droplet to Desktop

Step 3

In Lightroom go to “Export” and in the “Post-Processing” area you click “Go to Export Actions Folder Now”.

In Lightroom go to Export Actions Folder now

Next, move the previously saved Droplet from your Desktop into Lightroom’s “Export Actions” folder.

Move Droplet to Lightroom Export Action folder

That’s it. Now you can choose the droplet that you saved before in Lightroom’s export options for “Post-processing”. This works pretty similar in Mac OSX and Windows XP/Vista. My default Post-Processing droplet is at the moment: Smart Sharpen, Noise Ninja, Save as Optimized Jpeg.

posted in windows | 0 Comments

22nd May 2007

HowTo convert bin/cue to iso in Mac OS X

Since Parallels doesn’t like .bin/.cue images, i had to convert it into an .iso image. A few guides pointed out that simple renaming of the files might be enough, but that didn’t work at all. So i was searching for free-ware solutions and couldn’t find anything. Toast Titanium was the last chance.

You simply right click on the .bin file and open it with Toast. Next you click “Save As Disc Image”.

Finally you just rename the file extension from the default .toast to .iso.

After a minute Toast was ready and i was able to boot from the .iso image in Parallels. Worked for me.

posted in mac os x | 90 Comments

22nd May 2007

Parallels Desktop cannot be installed on this Computer

Got this error message when I tried to install Parallels Desktop Build 3188 on Mac OS X 10.4.8 .

Parallels Desktop cannot be installed on this Computer.
Make sure your system meets the requirements.

Found this easy guide: HowTo Install Parallels on AMD64.

Parallels Error Message

Worked for me.

posted in mac os x | 0 Comments

21st May 2007

CSS: 100% percent height

I wanted a css design with 100% height for some recent project. The middle centered column should just fill the whole page in height without forcing scroll bars. But somehow its buggy on a few browsers. I found this hack in the web which works quite nice at first glance.

html {
height: 100%;
}
body {
height: 100%;
margin: 0;
}
#content {
height: 100%;
}


Worked in Firefox, Opera, Safari, Webkit, will check for IEx later.

posted in reviews | 4 Comments

18th May 2007

Webkit the better Safari

I just came to Webkit. At first it looked like a new browser to me like Shiira or OmniWeb. But than somebody told me it is just the "thing" behind the scenes that drives lots of browsers on OS X.


So I downloaded the latest nightly build of Webkit and started using it.

  • CSS rendering looks much better now
  • got rid of the flickering in Safari when scrolling long pages very fast
  • can’t use Safari’s extensions anymore

Apart from that, the only difference is the golden symbol in the dock. It loads all of Safari’s settings, just because it loads Safari just with another rendering engine. In the Webkit blog they try to solve the confusions about Webkit really is 😀
So what to do now without Safariblock and without Saft ? Well, you can still use the userContent.css from floppymoose which kills most ads from your screen. Webkit although works with my earlier proposed mouse gestures for OS X. So far I’m quite happy with it.

posted in mac os x, reviews | 0 Comments

18th May 2007

Monitor Color Calibration for free using your DSLR

Color perception is subject to ambient light levels, and the ambient white point. (A red object looks black in blue light.) It is therefore not possible to achieve calibration that will be perceived evenly in different lighting conditions. The computer display and calibration target will have to be considered in controlled predefined lighting conditions. Controlled lighting conditions such as D65 help to suppress the effect of metameric colors which would further complicate the issue.(source)
You don’t need an expensive color calibration tool (spyder, eye-one, or similar tools) in order to detect the white point of your ambient light. You got all you need with your DSLR already.
So lets go through this guide to get a quite nice calibration for your monitor.

At first look for the light sources in at your working place:

  • Avoid these old yellow light bulbs for your room with the monitor and replace these with newer energy saving daylight bulbs.
  • Try to avoid mixed lights of different color temperatures. Close the curtains or sunblinds of your windows.
  • Brighten up the area behind your screen by placing a lamp behind it. This will ease your eyes and even improve the quality of your displayed images in terms of black level quality.

Step-by-Step Tutorial:

  • Place some neutral grey objects in the area behind your screen that you would see from the position where you are working. To make it simple: place some color chart on your wall or some medium grey coffee filter paper.
  • Photograph your workplace including the color chart or coffee filter at your wall using RAW format. Expose the picture to your calibration object (try to capture it with a good brightness).
  • Open your favorite RAW developer (CS2, CS3, C1, lightroom, …) and use the eye dropper tool 
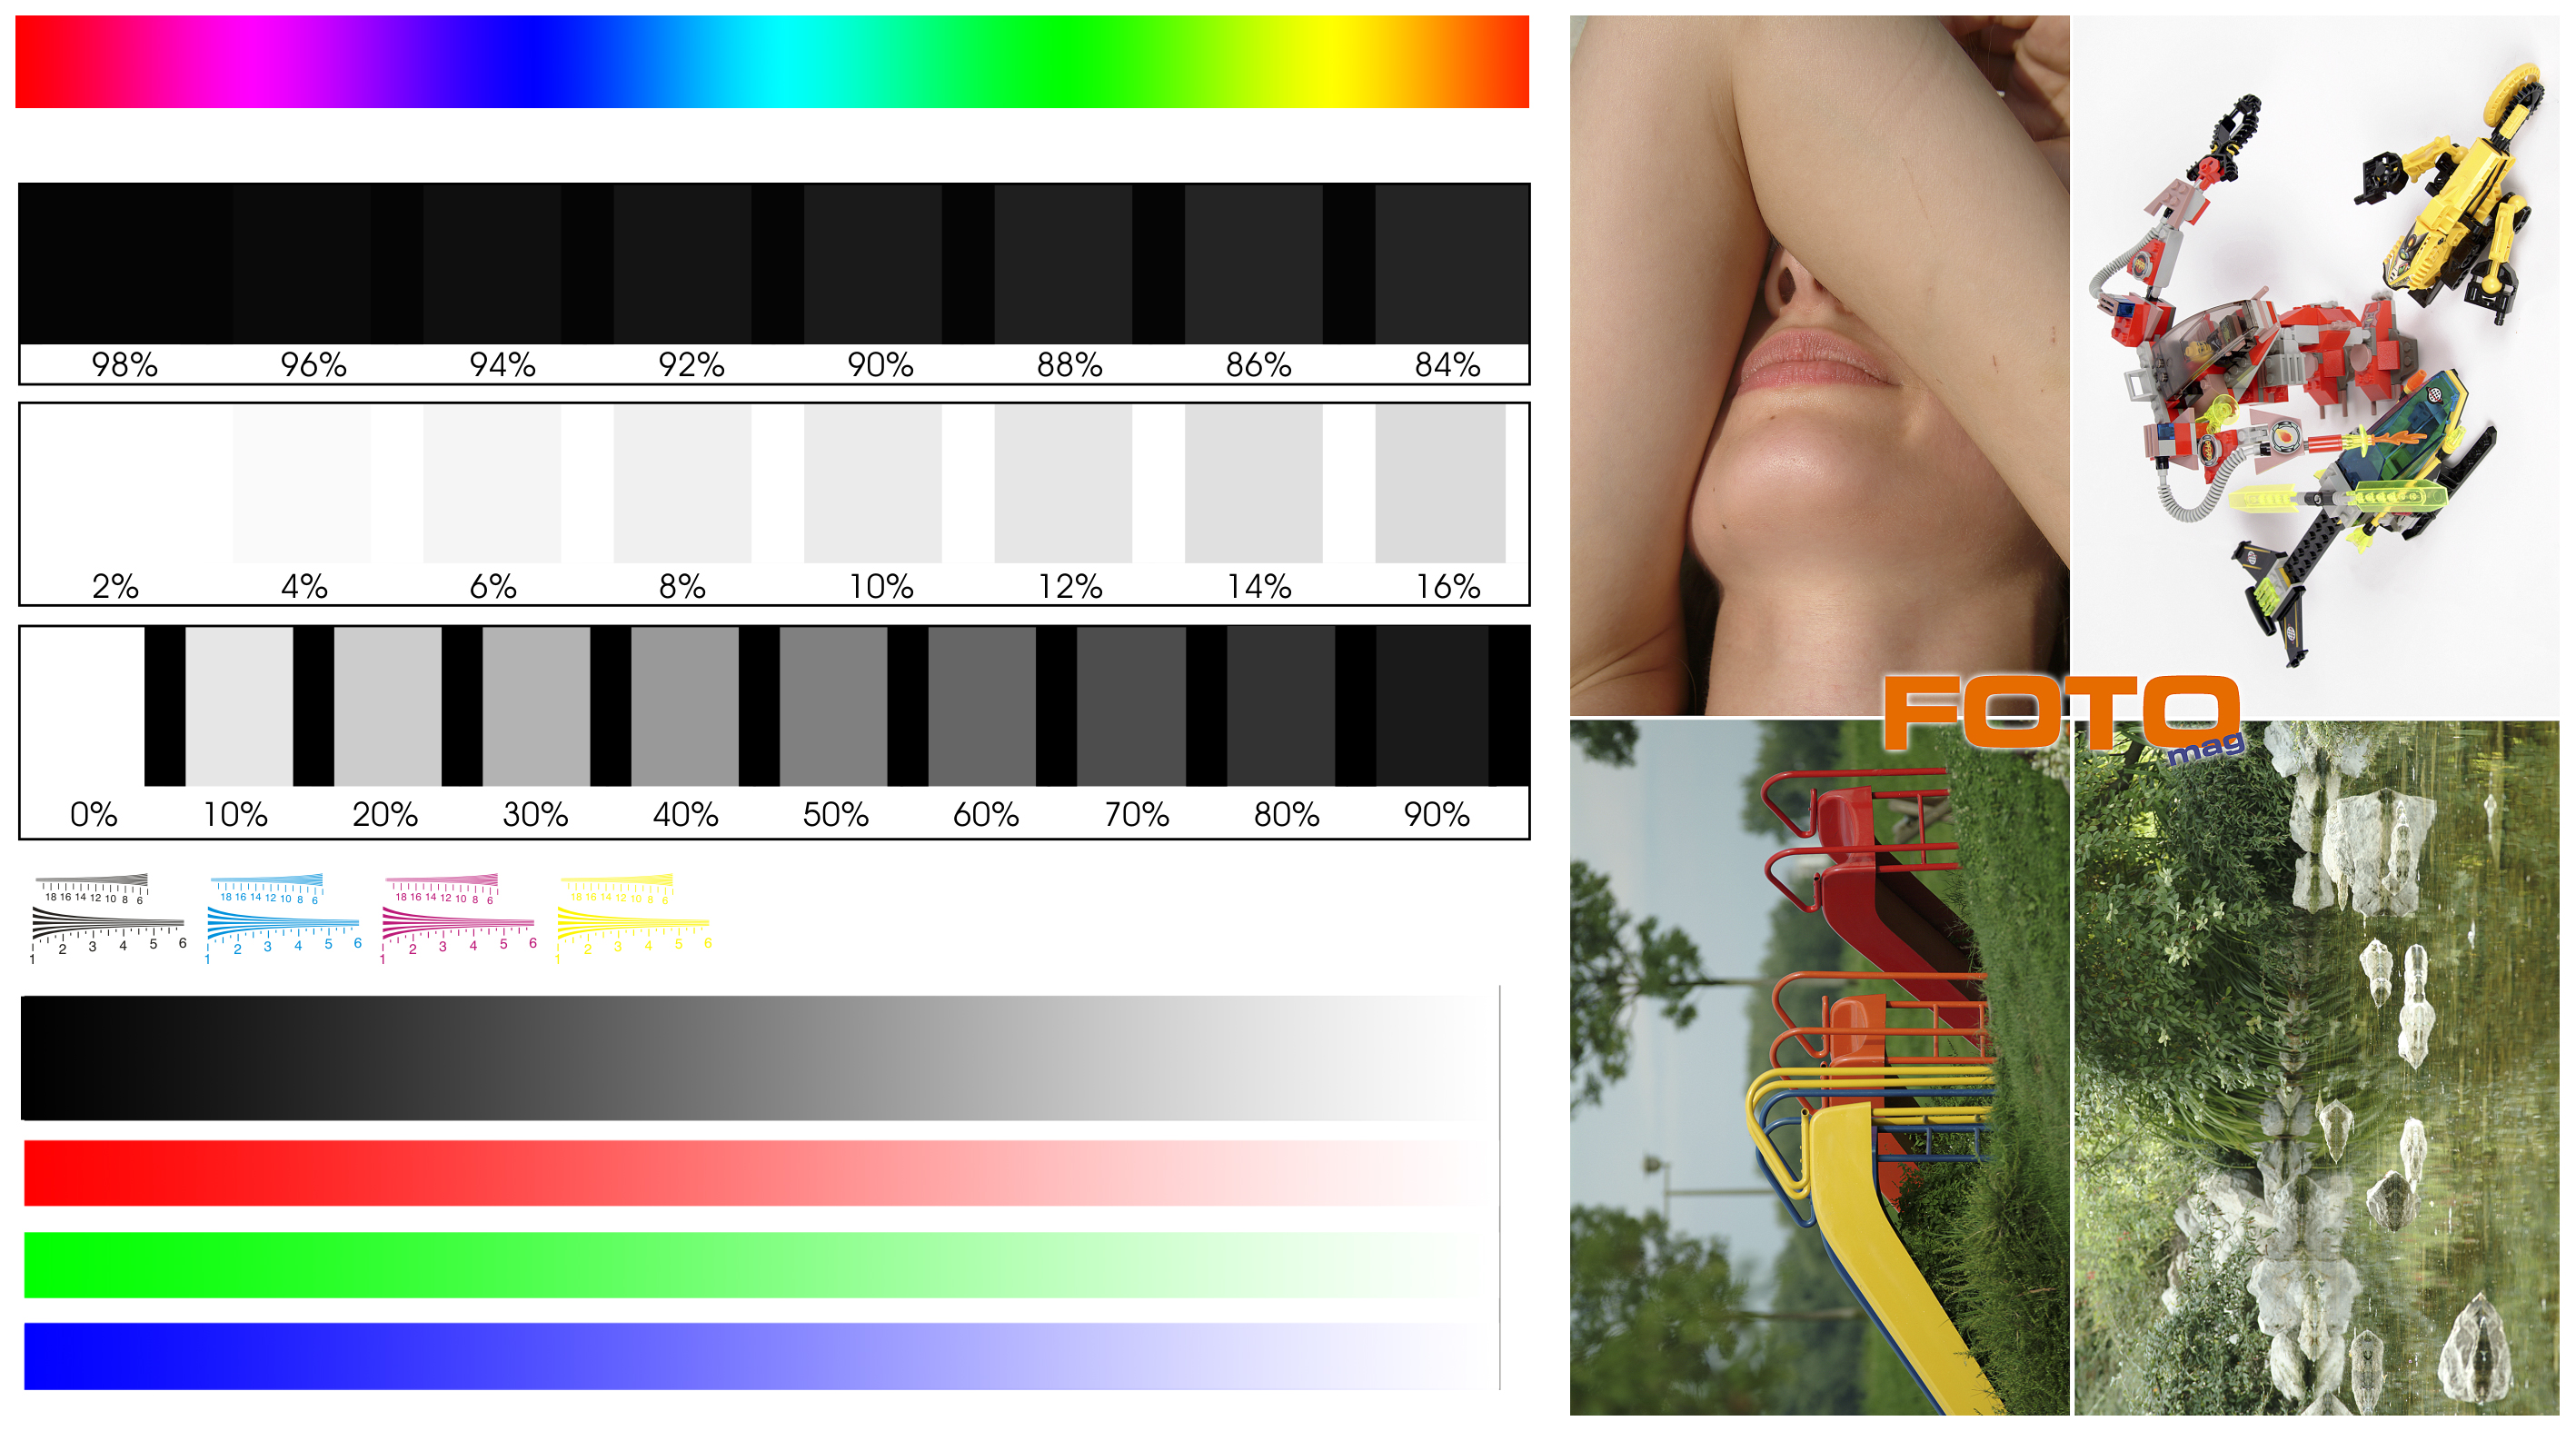
for white balance detection on your coffee filter or color chart from your wall. Do it several times to average the color temperature. Next write down the color temperature.
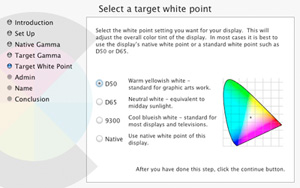
  • Ok now lets look at your monitor. Look into the OSD (On Screen Display) and for some color temperature settings here there and set the closest value to your inspected value. Some screens may support this feature. For the next step you don’t have to play with your monitor but with your mouse and keyboard again in the software. We need to modify the settings of your monitor profile in your Operation System:

In OS X it is like this. Go to System Preferences > Displays > Color and choose “Calibrate…”, check that “Expert Mode”, click through to “Target White Point” and set your new color temperature here. If that looks too complicated for you, you can use the simple mode and choose what is next to your value out of D50 (5000 Kelvin), D65 (6500 Kelvin) or 9300 (Kelvin). If you think that your screen is too dark (happens with old monitors over time) you may adjust the gamma as well in the wizard, but only go for the monochrome gamma correction here.

In Windows (XP and Vista) you need tools like “Adobe Gamma”, you get this with installing Photoshop, it is in your System Preferences area. Just choose your white point here by inserting the Kelvin value that you inspected before as the “Adjusted Value” and if you were able to select a color temperature in your OSD before you need to set this as the white point of your “Hardware”. If you got some old screen you might adjust the gamma here as well, but not on the single colors, just do it for the monochrome setting.

Ok, now comes the hard work. Open some color calibration chart (for example this one) on your screen with your favorite image viewer.

  1. Take your camera and make a picture of your working place with the color chart displayed on your monitor and the background area around your monitor with the coffee filter oder the color chart on the wall.
  2. Open the picture in your RAW editor and look for the color chart that was displayed on your monitor. Aim with the eye dropper tool for the grey value in the color chart that is almost as bright as your wall behind the monitor. Write down the inspected color temperature.
  3. Now its time to work with your monitor. Open the OSD (On Screen Display) and go to the color settings. Switch from the “normal” setting to the “user preset” and start with all values at factory settings, mostly r:50 g: 50 b:50 . Change one or more values in order to achieve your target white balance. If you need it warmer just add a little red and reduce the blue. But try to keep the average of all 3 values at about the half of your scale. For example if my scale goes from 0…100 i want it like (R + G + B) / 3 = 50. Write these 3 values down and go back to Step 1. to look how close you came to your target value and do it all over again until you reached your target value.

Things that prevent your success:

  • Your target is not really neutral grey. (see picture below)
  • You go to close to your screen and get weird colored lines on your picture. (see picture below)
  • Your backlight is too weak and monitor too bright or vice versa. Just tune your monitor brightness. (see picture below)

Things that can go wrong

It took me like 5-6 tries to come close to my target values. I got daylight bulbs at my working place at a color temperature of 5450 Kelvin.

Now it is your turn. Good luck with this.

posted in mac os x, reviews, windows | 100 Comments

14th May 2007

pixelpost template: macstyle v1.2

I’ve just released this template for pixelpost v1.6.

Features:

  • minimalistic design like iWeb’s black theme
  • slide-out panel for comments
  • photo strip with modified Reflection.js by neondragon
  • slideshow feature by jdleung

Download: macstyle_v1.2.zip (88KB) ! Please read the included readme.txt first !

posted in reviews | 836 Comments

27th March 2007

PHP::PEAR installation problems

I tried to install the Cache package for PEAR on Mac OS X 10.4.8 ( xampp installed ). Got the

error message: No handlers for package.xml version 2.0

Found the following solution:

pear upgrade --force PEAR-1.3.6 Archive_Tar-1.3.1 Console_Getopt-1.2
pear upgrade --force PEAR-1.4.11
pear upgrade PEAR

Than i was able to install ‘HTTP_Request’ and ‘Cache’.

Update: that was not all … i tried to use the Graphics.php for caching some gd calls. Got a Fatal Error on line 247 because of undefined function ob_end(); so that function really doesn’t exist, i guess its some dev note or so. But still after removing that line, there are massive errors. In the end i better coded my own caching functions.

posted in reviews | 8 Comments

14th March 2007

WordPress: blog images via email

Sometimes it is not that easy to tell people how to use wordpress admin interface for writing posts or even upload images. Sometimes you have to make it even simpler than simple.

I was looking into wp-mail.php at my wordpress installation and tried to figure out how to modify it for accepting attachments. On my way  i came to the wp-mailblog plugin. Lots of people were complaining in the comments area of that website and so it was pretty clear that it wont work for me. After that i found out that John Blade replaced the default wp-mail plugin with wp-mail 0.312 plugin. Sadly his website is totally bugged and most posts regarding that plugin are missing. Economy Size Geek picked up the project and continued it.

The new name is postie. It is the plugin i was looking for. You can post pictures and other files via email, which enables you to blog from your mobile phone pretty nicely. The installation was easy but the amount of options in the postie configuration is overwhelming. The biggest problem i’ve noticed was the char-set difference to the email client. But with some patience you can match both char-sets easily.

worked for me …

posted in reviews | 8 Comments

6th March 2007

My favorite Image Viewer for Windows

In the old days I was a big fan of ACDSee 4.0 , but it lacks of proper RAW support, because I always had problems with their buggy RAW plugin. The following versions became slower and slower and slower, not really usable in terms of speed. Next I became a user of IrfanView. It was fast but the video viewing capabilities were too slow on loading. Next I came to Picasa 2 which is not really meant for a double click in the explorer and exit by pressing Esc. Too slow for quick folder browsing. My latest discovery was XnView. It took quite long to startup and needed 2 times Esc pressing.

Than I came to FastStone. The FastStone Image Viewer 3.0 didn’t offer any skin that was looking good with my milky style. Although it had that problem with Multi-Page-Image-Files. When browsing a folder, it always get stuck on these types of images ( .tiff in my case ). But FastStone offers a smaller tool, called FastStone MaxView 2.0 (freeware). You can use it as a borderless window which makes it fitting into every environment without esthetic problem regarding the window manager style.

Faststone MaxView 2.0

Why I like about it:

  • fast startup from double-click in the Explorer
  • exit by pressing Esc once
  • excellent magnifier customization
  • very fast image browsing, even on big images ( 4096×4096 and bigger )
  • moving the mouse to screen edges brings up additional menus
  • continuous browsing by holding down the arrow keys
  • blazing fast on browsing folders with RAW files ( using embedded preview images )

posted in reviews, windows | 47 Comments

3rd February 2007

The Random OS X crashes …

I hate it when there starts a hidden process in the background, your hdd’s start spinning and rumbling and you don’t know whats happening. That doesn’t only happen in Linux (amarok http cache cleaner) or in Windows. This time it is Mac OS X and the funny thing is that one hidden process always crashed my system once or twice a day.

At first i thought i had to live with that problem. I looked into my /var/log/system.log and found this line:

cp: error processing extended attributes: Operation not permitted

Regarding this problem i found this neat guide for some completely different problem (last paragraph). In /usr/sbin/periodic you can find all the periodic hidden action that Mac OS X runs to maintain your system. Find the line with

cp /dev/null $tmp_output

and replace it with

> $tmp_output

Thats it, save and reboot. Funny thing is that Qumana crashed like 3 times while writing this post. I guess their spell check is still buggy.

Ok, the most wierd crash is on sudo periodic weekly .

I figured out that the command /usr/libexec/locate.updatedb crashes my system. The first fix was to disable it in the weekly.500 . I hope somebody can tell me why the database building for the locate command crashes on my system … My first guess is that i have too much hdd space to index and some cache is too small to hold the index while building.

So far i found these interesting articles:

Prevent locate’s update from updating certain folders

Make the locate command ignore certain directories

The last link worked. I made the locate-database-update ignore my /Volumes and now everything runs smooth.

posted in mac os x | 151 Comments

3rd February 2007

HowTo get Front Row 1.3 working on 10.4.8 AMD/Intel

After trying so many tutorials and installing so many tools i finally made it. Front Row 1.3 is running smoothly on my 10.4.8 AMD , and no illegal hacks were needed.

At first i tried this Front Row guide bei Andrew Escobar and ofcourse it was not working and ofcourse it crashed my system.

First get Front Row 1.3 from Apple’s update site and drag the FrontRowUpdate1.3.pkg from the .dmg on your Desktop.

Ok, for the next step there are 2 ways:

Download the Front Row Enabler 1.3.5 and just use it to patch the FrontRowUpdate1.3.pkg on your Desktop by clicking "Enable Installation". Never press the "Patch Mac OS X"-button !!! If you already pressed the evil button you have to look at Andrew Escobar’s website for further instructions on how to restore your /System/Library/PrivateFrameworks/BezelServices.framework and /System/Library/LoginPlugins/BezelServices.loginPlugin

The other way is to get the Pacifist 2.0.1 open the FrontRowUpdate1.3.pkg with it to install the 2 files manually.

Having this done we can proceed to the step where all my previously read tutorials failed.

At first i started with some kind of fake driver, like FrontRowPass.kext from Khadgar’s blog. This didn’t work at all for me.

Next i found this interesting guide for installing Front Row on the Mac Pro and just followed their "Case 2" by just manipulating the IOUSBFamily.kext .

The last step was to copy the Front Row.app from System > Library > CoreServices to my Applications folder and adding it as a Login Item in the Preferences Pane: Accounts (you can use the one in CoreServices as well). Restart and chose a way to start Front Row, for example by using such a little script named openfrontrow.app (you find it on several websites, just google for the name).

I got myself a copy of Wise Weasel’s Romeo Plugins 2.0 and used the Front Row Plugin for my Romeo. Now i can launch and control Front Row with my old Sony T610.

Worked for me.

posted in mac os x | 16 Comments

25th January 2007

FLAC and OGG support for iTunes – import and play

Well, i wanted to import my .ogg and .flac into iTunes but … you know the story. After 2 days of trying to compile amarok with kde3 and making it run natively with quartz-wm, i gave up.

The next day i found this nice blog post about adding ogg and flac support to iTunes.

Just get xiphQT (0.1.5) and install it ( open the XiphQT-full.mpkg ). Next get the flac import component for iTunes (its the flac_import_0.5b1_p0.1.dmg ) and drag the FLACImport.component into /Library/QuickTime . Last get the set-OggS tool (its the set-OggS-0.1.dmg ) and place the “Set OggS.app” in your dock or somewhere else where you can easily drop files to. Quit iTunes and restart it.

Now, what do you have to do for importing .flac into iTunes …

At first drop the .flac files on the “Set OggS” application (on the icon, not into the window).

Next just drag the .flac files into your iTunes. It takes a while to import and the playback will stop during that import period. Starting the playback of a .flac file although takes a while.

But after all, the .ogg and .flac files are in the library and you can play em as easy as all the other content. Just needs some more work on importing stuffs. Worked for me.

posted in mac os x | 1 Comment

21st January 2007

http-tunnel via ssh for Windows XP and Mac OS X

I’ve been using the bitvise Tunnelier for quite some time now in Windows XP and it is a real pleasure to use this easy tool.

For Mac OS X i couln’t find a tool like that until i came to the SSH Tunnel Manager . It is even easier to use than the windows tool and does a great job on tunneling your network traffic through firewalls. So you can have secure access to your non-ssl email accounts or just secure your traffic in a big company network. Ofcourse you still need some server outside your network with some ssh shell running.

posted in mac os x, windows | 1 Comment

21st January 2007

Safari Adblock without losing performance

Ok, i guess everybody noticed that importing adserver lists from websites like yoyo brings down most input managers for Safari. Even the userContent.css from floppymoose is slowing down the tab creation process in Safari.

After testing a lot with diffrent solutions i made up this final one:

Get the host list for macs from yoyo and edit your /etc/hosts.

Get Saft and delete all the URL match Patterns (and uncheck "Block Ad/Banners"). So you have the nice Fullscreen function for your Safari and more advanced controls about many other things in the browser. You can bind the Fullscreen shortcut to cocoasuite what i use for my global mous egestures in Mac OS X.

Next get SafariBlock v1.14 and delete all preset Filters. The special in SafariBlock is that you have a right-click on images, frames and flash movies to block em and set up filter rules for em. Works pretty well and the performance is still very good, as it would be without all these tools.

posted in mac os x | 0 Comments