22nd
May
2007
Since Parallels doesn’t like .bin/.cue images, i had to convert it into an .iso image. A few guides pointed out that simple renaming of the files might be enough, but that didn’t work at all. So i was searching for free-ware solutions and couldn’t find anything. Toast Titanium was the last chance.
You simply right click on the .bin file and open it with Toast. Next you click “Save As Disc Image”.
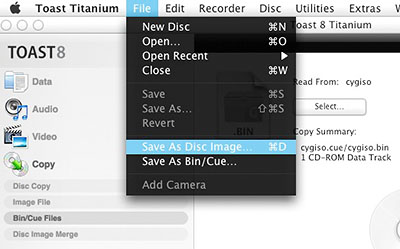
Finally you just rename the file extension from the default .toast to .iso.
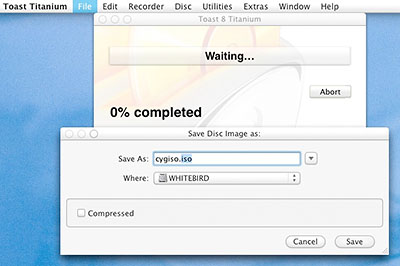
After a minute Toast was ready and i was able to boot from the .iso image in Parallels. Worked for me.
posted in mac os x |
22nd
May
2007
Got this error message when I tried to install Parallels Desktop Build 3188 on Mac OS X 10.4.8 .
Parallels Desktop cannot be installed on this Computer.

Make sure your system meets the requirements.
Found this easy guide: HowTo Install Parallels on AMD64.
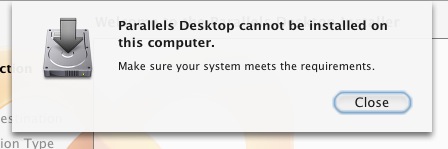
Worked for me.
posted in mac os x |
21st
May
2007
I wanted a css design with 100% height for some recent project. The middle centered column should just fill the whole page in height without forcing scroll bars. But somehow its buggy on a few browsers. I found this hack in the web which works quite nice at first glance.
html {

height: 100%;

}

body {

height: 100%;

margin: 0;

}

#content {

height: 100%;

}
Worked in Firefox, Opera, Safari, Webkit, will check for IEx later.
posted in reviews |
18th
May
2007
I just came to Webkit. At first it looked like a new browser to me like Shiira or OmniWeb. But than somebody told me it is just the "thing" behind the scenes that drives lots of browsers on OS X.

So I downloaded the latest nightly build of Webkit and started using it.
- CSS rendering looks much better now
- got rid of the flickering in Safari when scrolling long pages very fast
- can’t use Safari’s extensions anymore
Apart from that, the only difference is the golden symbol in the dock. It loads all of Safari’s settings, just because it loads Safari just with another rendering engine. In the Webkit blog they try to solve the confusions about Webkit really is 😀
So what to do now without Safariblock and without Saft ? Well, you can still use the userContent.css from floppymoose which kills most ads from your screen. Webkit although works with my earlier proposed mouse gestures for OS X. So far I’m quite happy with it.
posted in mac os x, reviews |
18th
May
2007
Color perception is subject to ambient light levels, and the ambient white point. (A red object looks black in blue light.) It is therefore not possible to achieve calibration that will be perceived evenly in different lighting conditions. The computer display and calibration target will have to be considered in controlled predefined lighting conditions. Controlled lighting conditions such as D65 help to suppress the effect of metameric colors which would further complicate the issue.(source)
You don’t need an expensive color calibration tool (spyder, eye-one, or similar tools) in order to detect the white point of your ambient light. You got all you need with your DSLR already.
So lets go through this guide to get a quite nice calibration for your monitor.
At first look for the light sources in at your working place:
- Avoid these old yellow light bulbs for your room with the monitor and replace these with newer energy saving daylight bulbs.
- Try to avoid mixed lights of different color temperatures. Close the curtains or sunblinds of your windows.
- Brighten up the area behind your screen by placing a lamp behind it. This will ease your eyes and even improve the quality of your displayed images in terms of black level quality.
Step-by-Step Tutorial:
- Place some neutral grey objects in the area behind your screen that you would see from the position where you are working. To make it simple: place some color chart on your wall or some medium grey coffee filter paper.
- Photograph your workplace including the color chart or coffee filter at your wall using RAW format. Expose the picture to your calibration object (try to capture it with a good brightness).
- Open your favorite RAW developer (CS2, CS3, C1, lightroom, …) and use the eye dropper tool
 for white balance detection on your coffee filter or color chart from your wall. Do it several times to average the color temperature. Next write down the color temperature.
- Ok now lets look at your monitor. Look into the OSD (On Screen Display) and for some color temperature settings here there and set the closest value to your inspected value. Some screens may support this feature. For the next step you don’t have to play with your monitor but with your mouse and keyboard again in the software. We need to modify the settings of your monitor profile in your Operation System:
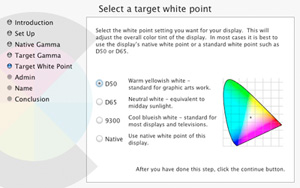
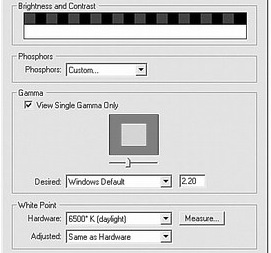
In OS X it is like this. Go to System Preferences > Displays > Color and choose “Calibrate…”, check that “Expert Mode”, click through to “Target White Point” and set your new color temperature here. If that looks too complicated for you, you can use the simple mode and choose what is next to your value out of D50 (5000 Kelvin), D65 (6500 Kelvin) or 9300 (Kelvin). If you think that your screen is too dark (happens with old monitors over time) you may adjust the gamma as well in the wizard, but only go for the monochrome gamma correction here.
In Windows (XP and Vista) you need tools like “Adobe Gamma”, you get this with installing Photoshop, it is in your System Preferences area. Just choose your white point here by inserting the Kelvin value that you inspected before as the “Adjusted Value” and if you were able to select a color temperature in your OSD before you need to set this as the white point of your “Hardware”. If you got some old screen you might adjust the gamma here as well, but not on the single colors, just do it for the monochrome setting.
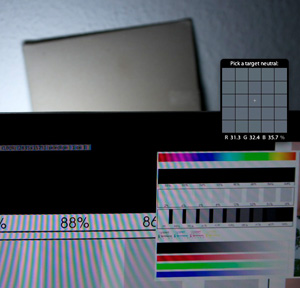
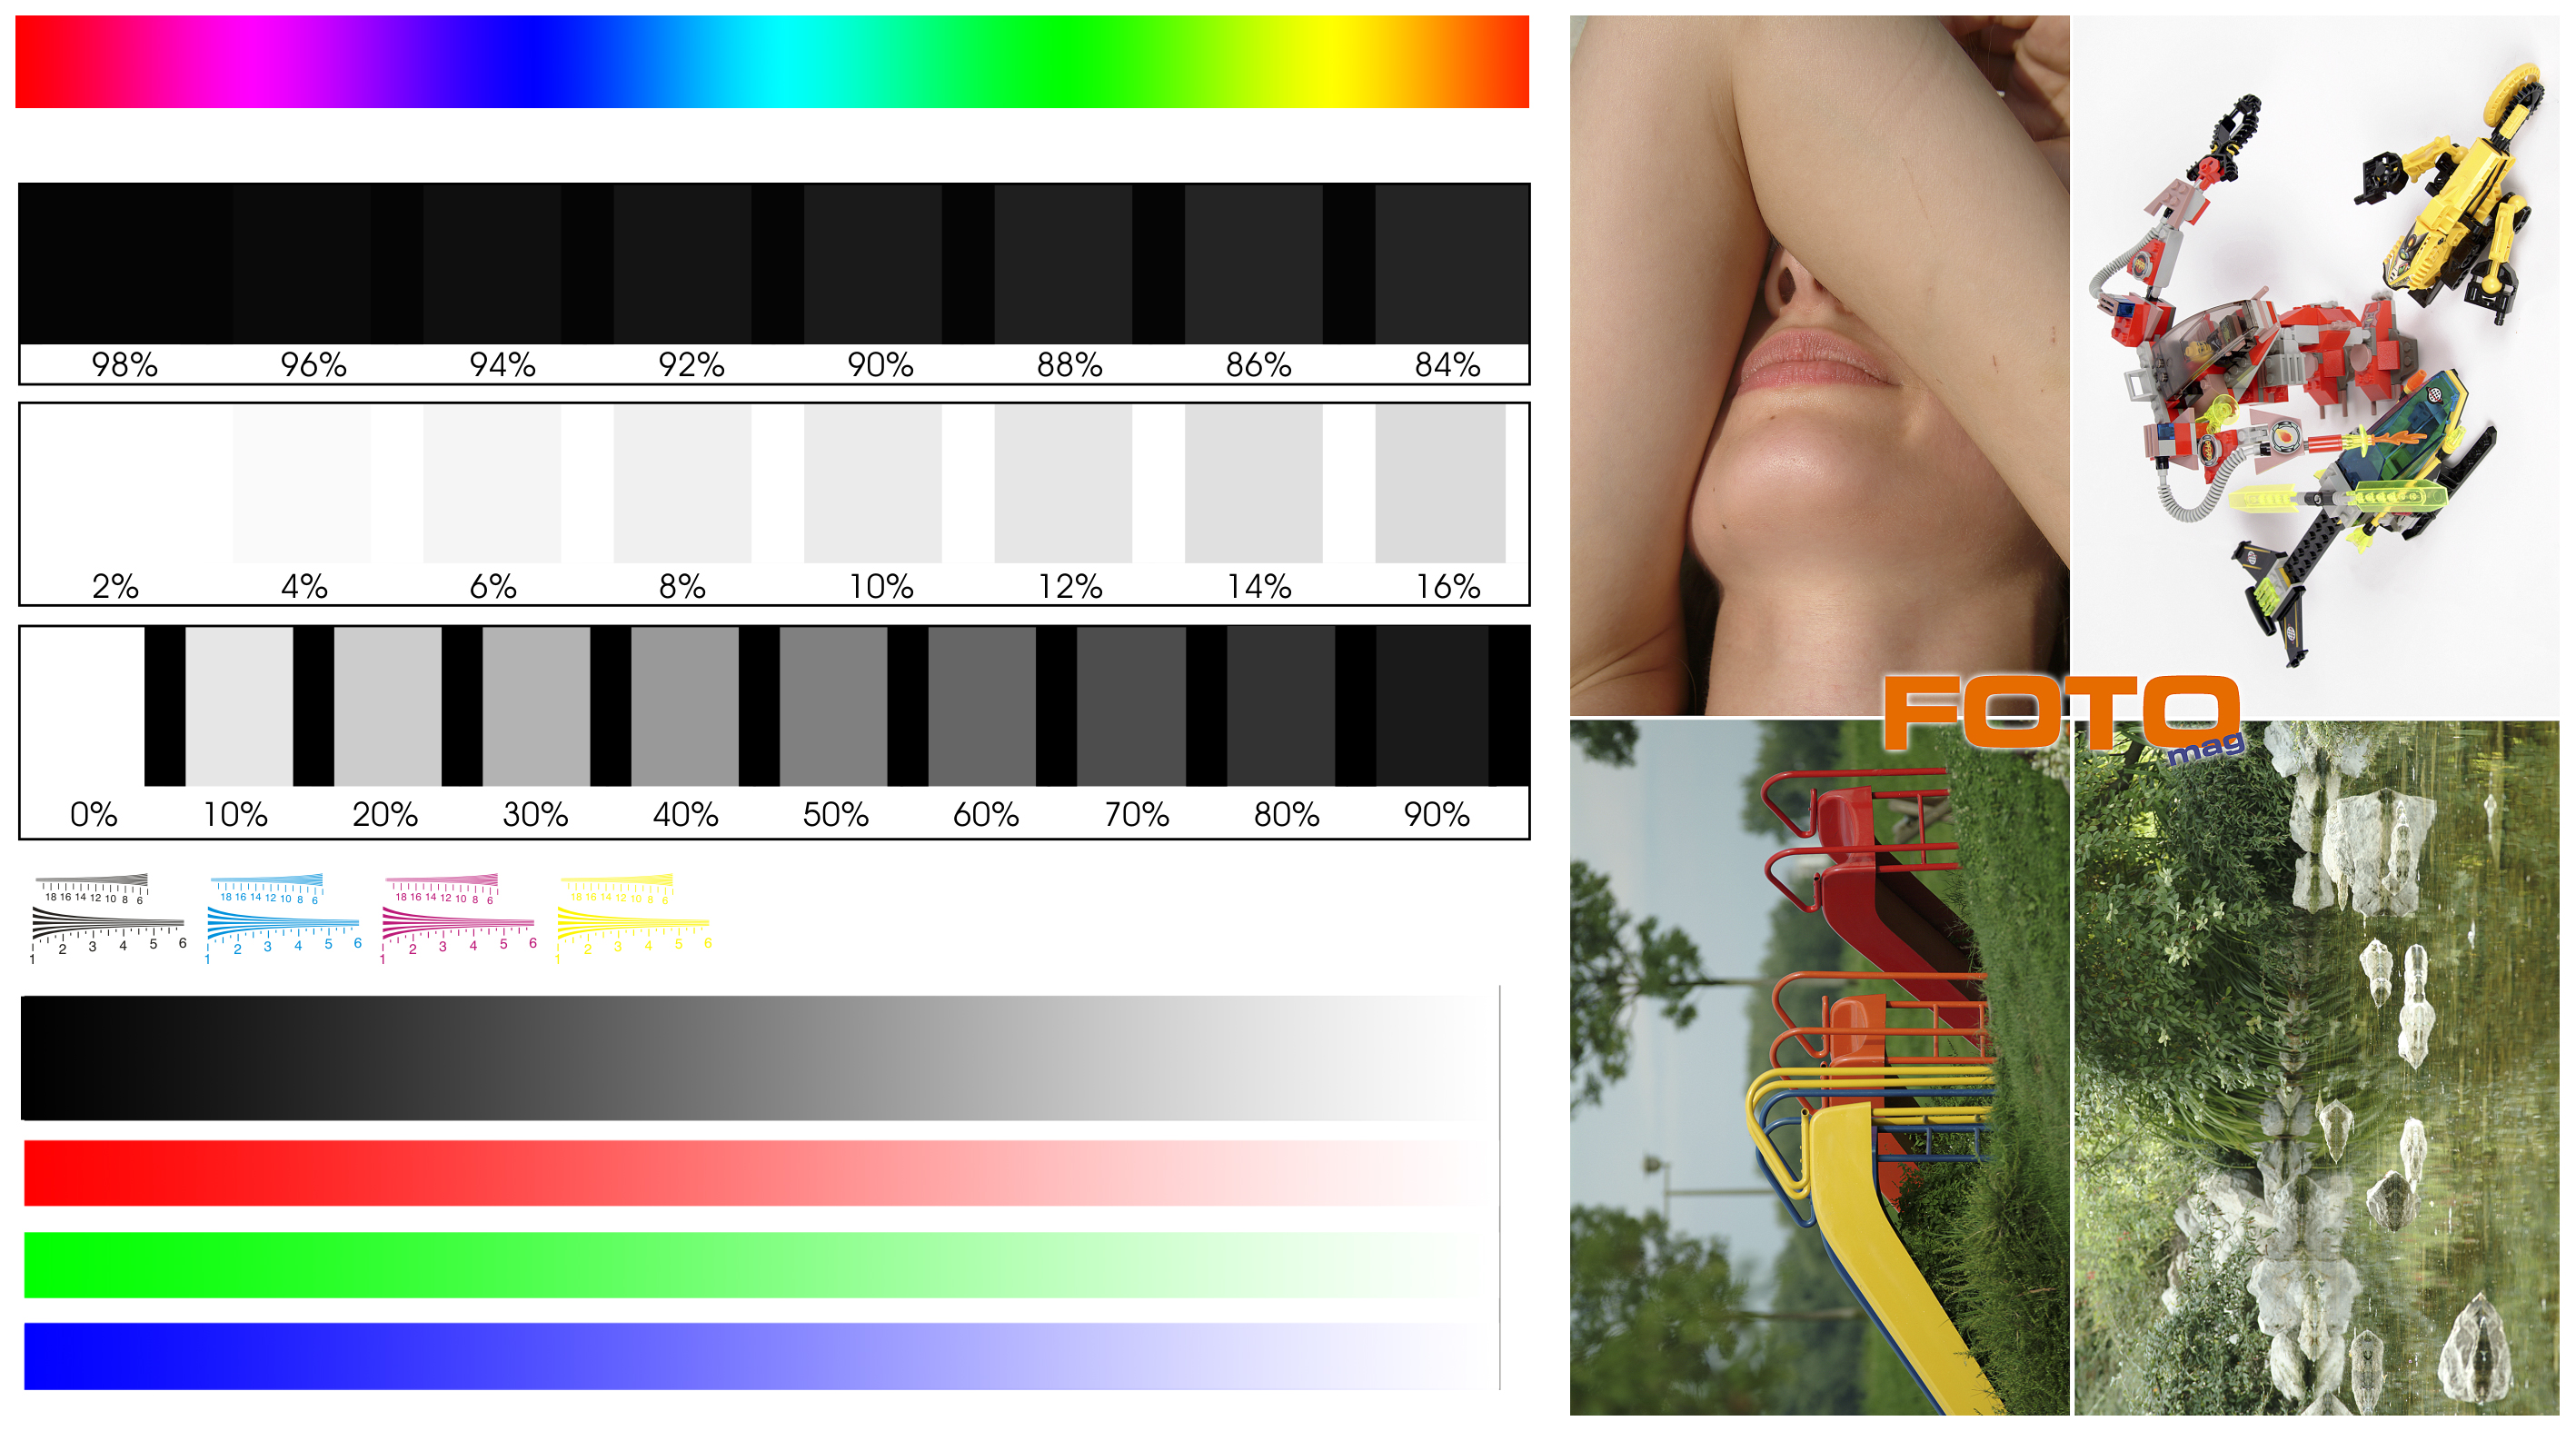
Ok, now comes the hard work. Open some color calibration chart (for example this one) on your screen with your favorite image viewer.
- Take your camera and make a picture of your working place with the color chart displayed on your monitor and the background area around your monitor with the coffee filter oder the color chart on the wall.
- Open the picture in your RAW editor and look for the color chart that was displayed on your monitor. Aim with the eye dropper tool for the grey value in the color chart that is almost as bright as your wall behind the monitor. Write down the inspected color temperature.
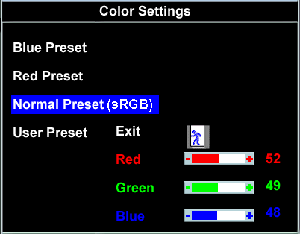
- Now its time to work with your monitor. Open the OSD (On Screen Display) and go to the color settings. Switch from the “normal” setting to the “user preset” and start with all values at factory settings, mostly r:50 g: 50 b:50 . Change one or more values in order to achieve your target white balance. If you need it warmer just add a little red and reduce the blue. But try to keep the average of all 3 values at about the half of your scale. For example if my scale goes from 0…100 i want it like (R + G + B) / 3 = 50. Write these 3 values down and go back to Step 1. to look how close you came to your target value and do it all over again until you reached your target value.
Things that prevent your success:
- Your target is not really neutral grey. (see picture below)
- You go to close to your screen and get weird colored lines on your picture. (see picture below)
- Your backlight is too weak and monitor too bright or vice versa. Just tune your monitor brightness. (see picture below)
It took me like 5-6 tries to come close to my target values. I got daylight bulbs at my working place at a color temperature of 5450 Kelvin.
Now it is your turn. Good luck with this.
posted in mac os x, reviews, windows |
14th
May
2007
I’ve just released this template for pixelpost v1.6.
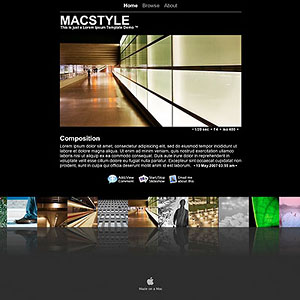
Features:
- minimalistic design like iWeb’s black theme
- slide-out panel for comments
- photo strip with modified Reflection.js by neondragon
- slideshow feature by jdleung
Download: macstyle_v1.2.zip (88KB) ! Please read the included readme.txt first !
posted in reviews |
